Visualizzazione post con etichetta One Hour Wargames. Mostra tutti i post

sabato 10 aprile 2021

Update

It has been several months since I wrote my last post on this blog. Lack of time and other projects unfortunately limited playing time, which was however compensated by more painting of Napoleonic 1:72 plastic minis.

After the last battle, I focused especially on Russian troops, with one unit of Grenadiers (Zvezda), one of Cuirassiers (Zvezda) which is useful as Guard Cavalry too, 3 artillery batteries (again from Zvezda), 2 units of Dragoons (Hat) and 2 of Cossacks (Hat again). A single unit of French Old Guard infantry (Esci) rounded up my painting effort during these last few months.


I think I now have a completely painted Russia Army, except for the officers' stands (Army CO and Sub-commanders). Maybe just a single Hussars unit would be good to have too, and I have some “reserves” (extra figures from boxes I haven't fully utilized yet) too in case they are needed.


Some of the painted units have been used in a recent small game based on OHW's scenario 12 ("An unfortunate oversight"), with Russian attackers vs French defenders (the French won), but I still plan to play something more structured.


In the meantime, I've bought some more minis too: a Prussian Infantry Sampler set from Hat, that has one sprue each of Marching, Action and command figures – the 1813 Prussian Army is one I really lack minis of, so this is a nice addition and the sample will let me decide which kind of poses do interest me more.


Then I bought a Italeri set of French Horse Artillery with prepared positions. I lacked Horse Artillery and this set has excellent sculpting, while the accessories are very useful for redoubts – I'm very pleased with my purchase. I also bought a box of French Young Guard by Hat: the sculpting is fairly good but honestly not exceptional, but the fact they're in greatcoats makes them useful for many roles and there are enough for 4 full units.


I have painted 3 units with blue greatcoats that will mark them as Young Guards (I need 2-3 of these for battles like Dresden, or La Rothiere), and one with grey greatcoats for generic infantry or for some of the less-well equipped Young Guards in 1813-1814. I've also painted an old Airfix French Foot artillery gun + crew. It may look strange, but almost no-one produces French foot artillery (only Guard artillery), except for the old Airfix and for Zvezda... and it looks like the Zvezda set too is impossible to find (out of production I guess...). Which is a pity because the Zelda sets are usually excellent and this is no exception. Unfortunately, it's not the only one I can't find (the Russian Hussars are not available anymore too...).


However, I now have all the painted units (except the general officers) I need for a scenario inspired to the Battle of Dresden in 1813, which I recently played. This will be the subject of a future post.

venerdì 5 aprile 2019

Flank attack... again

Finally some game time! With little time available I replayed the Flank attack scenario (n.6) from OHW, this time inverting the army composition.

Therefore, the French now had 4 Infantry units, 1 Light Infantry unit and 1 Light Cavalry unit. Their opponents, this time Austrians, had 3 Infantry units, 2 Artillery units and 1 Light Cavalry unit. I only took 1 picture towards half of the battle.

Mid battle situation

The Austrian deployed one arty and 1 infantry units as blocking force, while the rest deployed on the flank but north of the hill. The French therefore had to both face artillery fire during their advance and couldn't "outrun" the flanking force, which was able to support the blocking force effectively. This forced the French to use half their army to screen the flanking force - but this left too few units to broke through the blocking unit. In the end they were unable to move 3 units out of the trap (only 1 could do it) and were defeated.

I liked how this scenario run better than last time. Force composition can really influence the outcome, as well as smarter deployment by the flanking force. The troops trying to break through instead should really be aggressive or they won't be able to exit the 3 required units.

sabato 9 febbraio 2019

One Hour Wargames Scenario 6: Flank Attack

Salamanca lite...


I played One Hour Wargames Scenario 6: Flank Attack (1), which is inspired by the battle of Salamanca. Salamanca was a battle driven by surprise, and this element can't be attained in a wargame scenario, so the scenario is slightly different from reality.

I used this battle as a sort of playtest for my fast Grande Armée rules. I left Command and Control rules aside, including the impulse system, and I just tested the skirmish, artillery, movement and close combat rules. The game was therefore played with the normal OHW turns.

French forces on the march, while British troops threaten their flank

Seen from the other side, with the British blocking force

The French had 3 infantry (5SPs Sk2 each), 1 cavalry (6 SP) and 2 artillery units (Medium). The artillery units in particular were badly suited to a battle where they would have had to move fast. The British instead had 4 infantry (5 SPs SK2 each), 1 light infantry (6SPs Sk2) and 1 cavalry (5SP) unit: the lack of artillery means they have to get close to the French to stop them.
In short, the French had to sacrifice 1 infantry and 1 artillery unit to fend off the larger British flank force, while the rest faced the small blocking force. The initial French attack was repulsed, but 1 artillery and the cavalry unit arrived (the cavalry having previously repulsed their British counterparts) and a new attack managed to open the hole needed to break through and allow 4 units to exit the north edge, given them victory.

The French attack on the British blocking force

In hindsight, the British had to deploy the flanking force closer to the blocking force: this would  have allowed them to be in a better position to stop the French. Instead, the flanking force was farther, and they were too far away to avoid the enemy breakthrough.

The Grande Armée rules worked well, especially the skirmish, artillery and close combat rules: they were easy to play and fast. Regarding movement, I gave up variable movement quite early, and chose fixed movement: turning takes 1/4 of the movement, moving backwards while keeping the front to the enemy takes 1/2 movement, difficult terrain takes 1/2 of the movement.

Probably the same battle could be played inverting the army composition.

I hope to test the command and control rules soon, including the variable impulse turns.

venerdì 23 febbraio 2018

Bridgehead at Valeggio - 1848 Mincio Campaign

The sun rose and the soldiers started preparing breakfast and packing their equipment for resuming the advance. General Bes was happy: he had taken the bridge at Valeggio - with some luck and speed, he would soon reach Radetzky's rearguard. The men of his brigade were of high morale and eager for a fight despite the recent forced march. They had been greeted as heroes and liberators at Milan, and it has been encouraging, a good start of this campaign.
"They are coming!" An aide came to him with news from the forward sentries.
"Who?" Bes replied. Was the King already here? As far as he knew, even if the rest of the army was only slightly behind him, he didn't expect the main body to reach Valeggio at least until the afternoon - or maybe tomorrow.
"The Austrians" said the aide "they are closing on our positions". It took a moment for Bes to understand. If we lose the bridge, our army will face a bloodbath in retaking it.
He smiled slightly as he prepared to give the orders for the protection of the bridgehead. His soldiers would face the enemy even sooner than expected.
"Send a messenger to General Federici at division HQ, and to the King. "Tell them we need all the reinforcements we can get to hold the bridge."

I started the Mincio Campaign I talked about here. With the Sardinians/Piedmontese trying to cross the Mincio at two different locations, I decided to start with the bridgehead at Valeggio. (Note to readers: miniatures you see in the pictures are plastic 1/72 Napoleonics, acting as proxies)

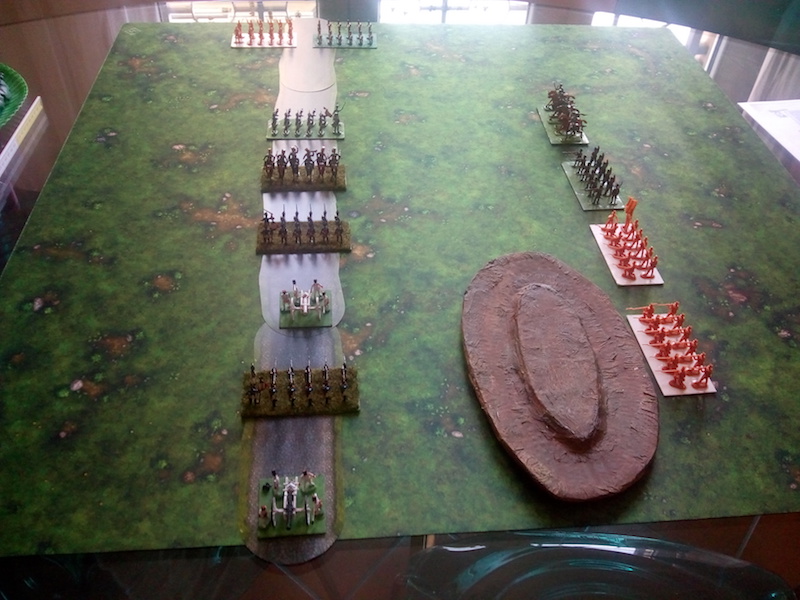
I used scenario 5 (Bridgehead) of Neil Thomas' One-Hour Wargames (OHW). This is the layout:


I tried to see how it would be with some buildings near the bridge, roughly representing the town of Valeggio.


It looks much better, but I wonder how it would affect play balance (I'll talk about it later). I therefore chose to keep the original scenario layout for now.

I'm still in playtest mode, so I played the scenario two times, one with OHW and one with Simplicity in Practice (SiP) to see the difference. Normally I use Wargaming 19th Century Europe, but I wanted to try these two, the first for quickness and the second for its mechanics. For OHW I had already played several times with the raw rules (I tend to use the Rifle and Sabre ruleset, even if for 1848 the Horse and Musket ones could be technically better) so I wanted to modify them a bit to address some issues I had:

1) infantry fire range is too great. Units seem to fire at each other from unbelievable ranges, at least when they are all armed with muskets. I understand it's made to avoid having defensive fire during the charge sequence (so you can fire at cavalry in your turn before they can charge in theirs), but I chose to decrease fire range to 10cm (as in SiP) and allow for defensive fire when charged, with hits applied immediately.

2) adding a morale check when you're fired upon and suffer hits (it always happens with the Sabre and Rifle rules), as suggested in another wargame blog. So after suffering hits you roll 3D6: if result is equal or higher than your current hits, you retreat 6 cm and lose 2 more hits. i felt it would represent both the progressive deterioration of units (as losses mount, passing the roll would become harder and units would be more brittle) and allow for units pushing back their opponents with successful attacks.

Turn 1 - Piemonte Brigade (General Bes) protecting the bridge
while Austrian Cavalry and Infantry advance
Bersaglieri rush to help, while Austrian reinforcements arrive behind the woods
 The Austrians got one of the worst reinforcement schedule they could get. While the two initial units arrived near the hill - the rest of the reinforcements came on the other side, behind the woods - and given that infantry and artillery can't enter woods (they didn't have skirmisher units) they are forced to make a long detour to reach the defenders. This would have a major impact.

As more defending brigades enter, the austrian Cavalry had been repulsed
and the infantry was isolated against Bes' soldiers and the Bersaglieri skirmishers.

With the first Austrian infantry unit routed, it really took a lot of time for the Austrians
to get their other units in attack positions;
meanwhile the Piedmontese bridgehead became stronger and stronger

The Austrian cavalry has managed to charge Bes brigade in thee flank,
routing it, but was soon routed itself by other supporting units..
As I said earlier. all Austrian reinforcements arrived behind the woods. It could make historical sense: the "north" is on the left of the picture, and the bridge at Monzambano is there. Most likely the Austrians were sending troops mainly from there... but it made for a harder battle here. (Actually, I realized later that I had misread the rules and the last reinforcements should have come from the hill side, but I let it go and continued).
Austrians finally prepare to attack, but Piedmontese artillery is in position too

The two attacking Austrian units rout the Bersaglieri,
but are too battered and will be unable to make much headway

The remaining Austrians units arrive, and start to deploy
From bad to worse for the Austrians. By attacking piecemeal, they are subject to strong concentrated fire from the Piedmontese. And they are unable to bring their artillery on the front.

Despite suffering losses, this last confrontation will see
their units routed while the Piedmontese lose only one.
By turn 12, all Austrian units had been routed, and the Piedmontese had retained control of the bridge.

Ruleset comments: the morale rule was mostly a disappointment - it wasn't really a factor except for units near the breakpoint, which meant it just quickened their rout but didn't really provoke the push-back / progressive deterioration effect that I hoped for. I might have to try it again. Plus, having defending fire meant I didn't know how to apply it to charging units - roll before the charge when they suffer hits from the defenders? or after? I decided to roll it after all charge losses were assessed. It mostly had no effect anyway and therefore was a non-factor. Reducing fire range was a better choice, but maybe 12 cm would be better than 10 cm. Still unsure about it.

Scenario comments: the Austrians got to the battlefield piecemeal, couldn't coordinate and were accordingly defeated. The arrival point of reinforcements had much to do with it - without skirmishers, arriving behind the woods delays a lot.

Overall, I had fun, but somehow I didn't see the "besieged" situation I thought when I think "bridgehead". This may have been an effect of the reinforcement schedule more than the ruleset.

I then replayed the scenario with SiP rules. I just tested one variation, regarding close combat: instead of rolling dice and see who made a higher result I would consider hits on 4+ - as other blogs suggested. Still, I will calculate results for both systems and see if any difference is made.

The first Austrian units arrived from behind the woods again, but things then proceeded differently from the first battle, with more Austrian troops coming from the road and from the hillside.

Initial moves

Slower movement rates in SiP means more turns before contact
In OHW, infantry moves 6" or 15cm. In SiP, infantry moves 10cm. Cavalry moves 30cm in OHW, 20cm in SiP. In both cases, it's 33% less. This has a relevant effect in determining when units get in contact, because in SiP it takes some more turns. Does this affect play balance? Possibly, because sides which have to cross larger parts of the battlefield will take longer to do so, which can make some scenarios artificially harder to win unless they are adapted. Here it impacted the Austrians on the side - being unable to use the road they couldn't reach the Piedmontese and this allowed them to be reinforced.

Both sides receive reinforcements
The Austrian hussars attacked the Piedmontese infantry directly. Not a smart move (a frontal assault by light cavalry against formed close order infantry is seldom successful) but i wanted to test close combat. As predicted, odds were brutally against the cavalry as the defending infantry could claim several advantages. In this case, no difference was noted among the different methods for resolving close combat: the Piedmontese rolled more hits at 4+ than the Austrians, and the total dice result too was higher. The battered cavalry (now at 3DP) was then kept in reserve for most of the battle.

After the Austrian Hussars failed to break the enemy, it's time for the infantry to try.
The Piedmontese were able to create a defensive position roughly as an half-circle in front of the bridge, with Bersaglieri skirmishers on the left, infantry in the centre and artillery on the left. Their strength lay in depth - reinforcing infantry was ready to cover any hole that could be created. The Austrians instead had chosen to maximize firepower and concentrate on individual enemy units, but this left no reserves to exploit successes.

The Austrians are slow in deploying,
allowing the Piedmontese to create a defensive position
The firefight was intense but at first produced little results. A potential breakthrough could happen on the Piedmontese right/Austrian left. Thanks to Austrian artillery on the hill, the Piedmontese brigade on the right was weakened enough to allow the Austrians to charge it with their own infantry... the entire flank could crumble, but the attack was repulsed! Thanks to support, both attacker and defender ultimately had the same number of advantages, and the defenders won. In this case too there was no difference in results using the two resolution mechanisms. The Austrians rolled only 1 hit at 4+, while the Piedmontese rolled 2. Likewise, the Austrian die total was 1 point less than the Piedmontese one. The attackers had to fall back and would be eliminated soon after.

The Austrian infantry on the right has just failed to break the Piedmontese line
and had to retreat! In the centre, the battle is fierce.

The Piedmontese have reserves, who help keep the line intact...
The Austrians managed to destroy one Piedmontese infantry brigade in the centre, but it was replaced by another. This too was routed, but another one arrived - and it finally proved too much for the weary Austrians who had endured the Bersaglieri fire for hours.

...but Austrian fire is efficient and creates new holes.
In the end, most Austrian units were routed and the remaining ones were too weakened to have any hope of breaking the Piedmontese line, leaving contro of the bridge to King Charles Albert's men.

In the end however, it's the Austrians that have to concede,
having lost most of their units and being unable
to break the last Piedmontese defenders.

It was a more tense battle than the previous one. Firefights in OHW are really fast to reach resolution (at least with the Sabre and Rifle rules, I should have used the Horse and Musket ones instead), here they were more attritional, and it felt more historically correct.

Ruleset comments: First time I used the SiP rules and I'm happy with the result. I liked how the battle unfolded and I felt the rules drove that nicely. I feared that the slow movement rates would make the 15-turn limit too short, but the game arrived to conclusion in 13 so it wasn't an issue. Not sure if the slower Austrian approach helped the Piedmontese however. Still the game was fun.

Scenario comments: this time the Austrians arrived from different locations and it made a marked difference. They were able to mount a more coordinated attack and had some success, but their lack of reserves proved fatal as they couldn't exploit their successes. The initial cavalry charge proved to be detrimental for the Austrians: the hussars were too weak to attack again, and instead they would have been better used by threatening/charging the Bersaglieri skirmishers on the Piedmontese left - then threaten the flank of the infantry. Overall, a good battle narrative was created.

After the battle, I thought about using terrain that models the historical battlefield. I'll talk about that in a later post.

domenica 11 febbraio 2018

3 Sessions and (sort of) review of One-Hour Wargames

I published this on Boardgamegeek (BGG) in October 2017, and it was the reason I got back to miniature gaming. I'm posting it here too.

I recently got One-Hour Wargames after reading several reviews both here and elsewhere and reading some session reports. I felt it could fill my need to re-build some sort of enthusiasm for miniature wargaming, which was somehow reduced by the few time available for gaming and collecting minis for larger games. And I wanted something to play both Horse and Musket (7 Years War and possibly Napoleonic) and later XIX Century Wargaming (from Italian Wars of Independence to APW and FPW). I was aware I wouldn't get very period-specific rules or an accurate simulation, but I wasn't going to ask for that exactly because such a thing would bring me again to time-consuming rules.

It was ok for me to have some quick rules that would give me some vague but definite period-specific feel and allow me to complete at least 1 from start to finish game (2 would be even better) in an evening or short afternoon.
I'm a strong supporter of rules that give realistic results even if dynamics are simplified or abstracted, as long as the abstraction/simplification is justified.

Neil Thomas does a good job in justifying his choices, and they sound reasonable.

I tried them with the Sabre and Rifles rules (XIX century rules), trying 3 scenarios. I played Sardinians/Piedmontese (Red) vs Austrians (Blue), and considered each infantry unit as a brigade (to have some sort of "scale", which isn't however well represented in the rules). It doesn't really work with skirmishers, which actually never fought in independent brigades (Italian divisions had Bersaglieri companies or Bns attached), but I could abstract it as a formation of skirmish troops likely smaller than a brigade but still able to exercise significant effect.
For cavalry 1 unit equal to 1-2 regiments would be fairly good.
I chose the 1st scenario and randomized the other 2 to get various situations. I also randomized the armies' composition with the tables inside the book.

1st scenario: Pitched Battle (n.2)
I wanted to start with a simple, straightforward battle. However, I choose scenario 2 and not 1 because I preferred to have some objectives instead of just going against the other side.

Piedmontese army was artillery-heavy, with cavalry and infantry, with one battery on the hill and rest on the nearby plain. Cavalry was on the other side, infantry in the middle in two lines.
Austrian infantry were concentrated near the crossroads, artillery in front of the hill with Jagers (skirmishers) nearby. They had no cavalry.

The Piedmontese attacked over the front, with artillery supporting the advance. Austrians formed positions to hold, with only the Jagers moving towards the enemy. This proved wrong as the unsupported unit was soon targeted by artillery and one Piedmontese brigade.
As the Jagers routed, rest of the Piedmontese charged towards the Austrians that, staying on the defensive, were able to inflict serious damage. Piedmontese cavalry pinned one Austrian brigade on the side, but were overall not able to do much more than that, unable to flank the enemy positions and not willing to face enemy firepower head-on.
Fighting was fierce, but overall the Piedmontese suffered the worst of it. This was also due to the fact the artillery on the plain was soon obstructed by the advancing troops - a reminder that putting all artillery on the hill would have been a better choice.
The brigade on the second line had tried an encircling move and therefore when the front brigades broke, there were no reserves.
The Austrians suffered losses too, but their second line allowed them to exploit successes and were then able to make a full advance and take the hill, routing the cavalry and the artillery.

This battle showed me some basic (and very realistic) things that the rules system correctly highlights: attacking in open terrain against a static enemy will cost you brutal casualties. You definitely need reserves (also when defending), because 1st line brigades will soon suffer and without reserves even winning troops won't be able to sustain the offensive for long. Firefights are bloody.
Cavalry could be very useful if it can flank the enemy but if they can't, like here, they can only force enemy troops to keep an eye on them - or risk an even bloodier charge.
Overall, quite realistic, despite the obvious simplification in mechanics.

2nd scenario (randomized): Twin Objectives (n.21)
Piedmontese troops were defending, with one infantry brigade on the lightly wooded hill, two brigades inside the town and one Bersaglieri (skirmishers) brigade in the nearby woods. The two positions are utterly isolated from each other but they force the attacker to either split from the start and attack with few strength both targets or lose time concentrating first on one and then on the other.
Unfortunately for the Austrians, they got the worst possible army composition for this battle: no artillery, 2 cavalry,1 Jaeger and 3 infantry brigades.
With cavalry unable to enter the lightly wooded hill, the woods or the town, that makes 1/3 of the Austrian force with little use... those Piedmontese surely took the best positions when they noted that that Austrian force was approaching...
Austrians moved two brigades (1 Jaeger, 1 infantry) against the hill and moved the rest towards the town. With 15 turns only (probably reinforcements were approaching...) they couldn't lose time.
But dividing forces also meant less strength against the forces on the hill. The Piedmontese brigade there fought bravely and even if it was ultimately routed, it made the advancing Austrians suffer from it.
As the Austrians moved towards the second objective, they saw the Piedmontese had no intention of getting out of cover. still, Austrians smartly maneuvered attacking only part of the defenders at a time, and this allowed them to concentrate fire. The Bersaglieri therefore had to leave the cover of the woods in order to threaten the flanks of the Austrians attacking he town, but that allowed the Austrian cavalry to finally use them as targets.
The Austrian infantry suffered big losses but eventually were able to drive the Piedmontese defenders from the town just shortly before the deadline. Somehow this scenario could represent a situation very much like Curtatone and Montanara (with some modifications to be made if one prefers it to mirror reality more closely)

Lessons from the scenario: cavalry, generally underpowered in this era (and rightly so) are even less useful if terrain is unfavorable. Also, towns and fortifications are correctly hard to crack unless a well-organized, sustained attack is carried out. Still, defenders may find it useful to harass the approaching attackers before they can coordinate, to avoid being defeated in detail.

3rd scenario (randomized): Disordered Defense (n.27)
Somehow the 3 scenarios fit quite a good narrative (very 1848-like)... after the previous wins, the bloodied but victorious Austrians now see the opportunity to strike the final blow to the Piedmontese by attacking their now overstretched forces.
The reduced-in-number but well-led and highly-motivated Austrians (3 infantry brigades, 1 artillery battery) therefore attacked the stretched Piedmontese near a vital road crossing. Three infantry brigades were in the area, but trying to cover all the area they were mostly isolated from each other.
The Austrian force focused on the first brigade, quickly dispatching it, the other two brigades sent for help (under scenario rules, reinforcements would get to the battlefield on turn 8) and advanced, but again not really coordinating as the Austrian artillery hammered them from distance and the infantry was on them before they could link.
Austrians were therefore able to gang up on the individual Piedmontese brigades and destroyed them. One Austrian brigade was hurt, but still able to fight.
As the Austrians got to the crossroads and took a defending position, Piedmontese reinforcements arrived, with two infantry, 1 cavalry and 1 Bersaglieri units. They staged a concentrated attack on one of the Austrian flanks, and the damaged brigade soon broke, but the disciplined Austrian fire and the artillery also continued to prove too much (some key die rolls favored the Austrians). The Piedmontese cavalry finally proved effective, with a flank attack that bloodied (but didn't rout) another Austrian formation already exchanging fire to the front, but couldn't reverse the overall situation. Both sides suffered losses, but with their infantry defeated, the Piedmontese cavalry couldn't dislodge the remaining Austrian forces, which finally claimed victory by retaining control of the crossroads.

The Piedmontese army was defeated and would have to retreat to regroup, likely asking for a truce.

Lessons from the scenario: ganging up on enemy units is the best and only way to avoid suffering a bloody exchange that usually leaves everyone battered. Therefore isolated units can easily become prey of a determined enemy attack. Cavalry in open space able to maneuver becomes dangerous if the enemy is aready engaged, which is exactly its role and again mirrors reality well.

Overall considerations: I liked the feel, the realistic results (despite the obvious over-simplification of mechanics, some ideas on small improvements came to my mind as I played) and the different scenarios (very well written and quite immersive) which made things really fun.
It's a game I will continue to play and I'll try other periods to see if they hold up as well.
This isn't a ruleset for everyone, however. If you have the time, models and space to play a more complex ruleset, then you'll find more reward for your time. But if you need a quick, fun system that gives a fairly good (not exceptional) period feel with realistic results, then this one becomes a good choice. Especially if you have little space, time and few models.
Some house rules can make it even better, but I wouldn't make it too complex or you would lose its advantages.

Last consideration: time. I played 3 games in about 2 hours. The "One-Hour wargame" therefore can last even less than this from start to finish and you not always get to the full 15 turns. You could easily make 2 games (even with a few more units per side, the system could work well with 7 and likely 8 or maybe even with 10, even if in the latter case you'd need a larger playing field) in a single evening with ease.

sabato 10 febbraio 2018

Rules I play

Over the years I've played several rulesets, even if, looking at various wargame blogs, not as many as most wargamers have.

I've played DBA and especially DBM, Field of Glory and, for Napoleonics, Napoleon's Battles (1st ed, I also have 3rd ed but never tried it). Aside from Field of Glory occasionally, I don't play any of those anymore, mainly due to lack of time. I also have Field of Glory: Napoleonic, but never played it either.

Napoleon's Battles 1st ed

I've recently started playing with Neil Thomas' rulesets, which have become my favorite ones because they combine ease of playing, short time and - despite simplicity of mechanics - good historical flavor, better than many other more detailed rules. I own One Hour Wargames (pdf), Wargaming Nineteenth Century Europe (book) and Simplicity in Practice (pdf of Battlegames magazine). I like NT's approach and his design notes are very good. I think he's still missing something about Napoleonic warfare (especially firefights dynamics, as I will discuss in the future), but for XVIII century or post-Napoleonic XIX century I feel he's mostly spot-on. I haven't tried his rules for earlier periods, but I might in the future.


Simplicity in Practice is inside issue 23 of Battlegames magazine

NT's rules allow me to play when I have few time available, and use my miniatures (especially plastic ones) with an "element" basing that I feel is better at representing historical reality from an army commander point of view. I have little interest in skirmish or one-division-a-side battles, while I prefer corps- and army-sized battles. And NT's rules are easily customizable (especially OHW) which help suit it to my needs where needed. So far, the only other rulesets that could mirror such a perspective would be Sam Mustafa's Blucher, which I actually hope to try sooner or later.