I played the first scenario of the campaign using a pre-existing scenario (n.5,
Bridgehead, from One-Hour Wargames). It worked fine and it was fun. But what if
I want a more realistic battlefield?
In the Habsburg 2nd Military Survey map, Valeggio is this one:
 |
| Valeggio sul Mincio and Borghetto |
I’ve been
there 2 times with my wife, for romantic weekends: Borghetto is a lovely place
and the Parco Giardino Sigurtà, full of flowers in spring, is a nearby attraction (by
the way, inside the Giardino there’s a place marked as the one where Napoleon
III and Franz Joseph met after Solferino).
The bridge
over the Mincio was built in the XIV century and was massive, because it was
intended as being a sort of dam too, but it never really worked as expected. In
addition, the French blew it up in 1701. A simpler, wooden bridge was rebuilt
between the two remaining older “blocks”, still existing in 1848 (now it’s made
of iron).
 |
| Il Ponte Visconteo, the bridge over the Mincio at Valeggio, seen from Borghetto. You can see the remnants of the XIV century structure. |
Another
ford is possible at nearby Borghetto, but what maps fail to show is that the
two places aren’t at the same height. Borghetto is lower and water current is
fast. Likely there was a small wooden bridge there (there's a bridge even now and a pontoon bridge could be possible) but it would be very narrow and the current has to be
kept in mind. In addition the position is exposed because of the nearby dominating hills
that separate Valeggio itself from the river. Then you would have to make a
steep rise to reach the top of the hills. The bigger bridge (called “Ponte Visconteo”, “ponte”
being the Italian for “bridge”) is higher and makes it easier to reach the
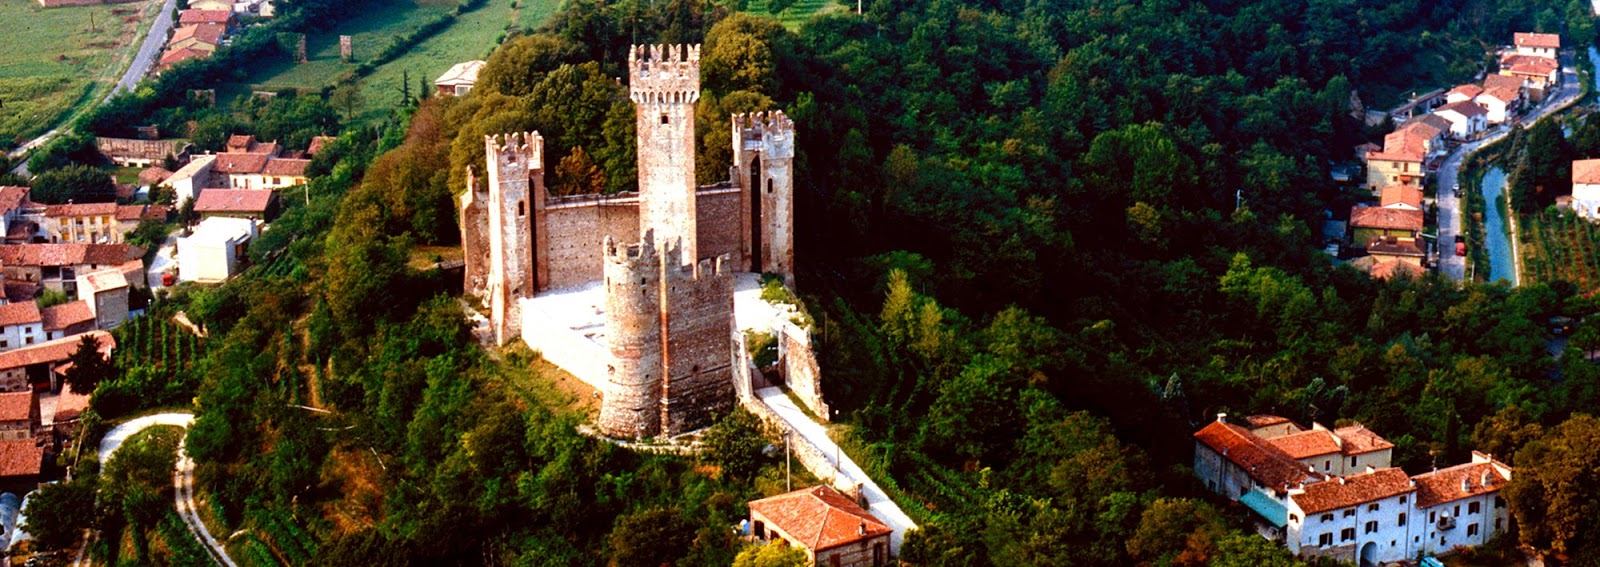
hills and the town. There’ s an old ruined castle (it was ruined in 1848 too)
in front of it, but not really a strongpoint that can block the path of
attackers.
 |
| The castle (Castello Scaligero) looking at the bridge over the Mincio. Borghetto is the town on the left across the river. In 1848 it was smaller. |
 |
| Another view of the castle, showing the hillside. Valeggio is on the right, Borghetto on the left (remember they were smaller in 1848) |
Then, after Valeggio, there’s nothing.
 |
| Larger view of the area around Valeggio |
It’s almost all flat up to
Verona, with only some hills in the north, but they affect the area at
Monzambano farther north more than they would do for any battle at Valeggio. In other words the bridge,
the hills around Valeggio and Valeggio itself are the only features that would
influence a battle. Regarding woods, you can see the area between the bridge and the hills is now wooded, but the map doesn't really show this unless we assume the slopes had wood. The area around the river could be at least partially marshy... depending on how you interpret the "greenish" color there.
I'm not sure if the attacking Piedmontese tried to cross at the main bridge or the smaller Borghetto one. I didn't check the direct sources, and Embree's Radetzky's Marches mentions Borghetto only - but doesn't mention the two bridges or say which one was used; it just mentions a wooden bridge. The Ponte Visconteo would be better, more direct but, possibly, offer less cover. At the same time the bridge at Borghetto would be smaller but would require a steep rise later. The account of 3 Piedmontese soldiers being trapped on the Western side of the river for the night after the Austrians had shelled the bridge may imply it was the one at Borghetto (because they found refuge in the village buildings) but in theory they could have been likewise able to get there from the other bridge too. Anyway, in my scenario it wouldn't matter much: the Piedmontese have taken the bridge and occupied the hills and are trying to protect the bridgehead from attacking Austrians. The bridge itself would be less relevant as whoever owns the village of Valeggio and especially the hills at the end would actually win.
A simplified map (OHW-style) for a “Bridgehead at Valeggio”
scenario could be like this (total size 90cm x 90cm - or 3'x3'):
 |
| From the South (as in the historical map) |
 |
| From the West |
 |
| From the East |
The area of Valeggio is the one roughly within the buildings, and the hills should be impassable for cavalry. Artillery on the hills can fire above the town. It can be a very strong position for defenders, even if, if they are few at start, they may be unable to defend it all and therefore be vulnerable to a determined attack. As in OHW scenario 5, attackers' arrival should be randomized between the two roads and the south (or only between the two roads but this may make it easier for the defenders to concentrate). Play balance may need some adjustment.
If you
really want to add some more terrain, add some woods just near Valeggio. They don't look particularly heavy, so maybe they would just be another help to the defenders, which may skew play balance even more. We can assume they are there but have no influence on play.
Regarding OoBs, randomizing is fine, but likely both sides would have skirmishers.
One final historical note: at first glance the hills between Valeggio and the river look like a
formidable position for defenders trying to cross. Why didn’t Radetzky try a
stronger defence? He limited his troops to a token delaying action. The problem
is that Valeggio is effectively in the middle of the Mincio valley and, as
noted, has no relevant heights or defensive terrain behind it up to Verona.
 |
| General Mario Broglia, CO of Sardinian 3rd Division |
Yes, a
reinforced Austrian position could block the advancing Piedmontese attackers
(General Broglia’s 3rd Division, II Corps) but the Piedmontese were
trying to cross north at Monzambano (a much harder defense) and south at Goito
too. Therefore the Piedmontese could cross elsewhere and then try to trap the
Austrians (at least a brigade, possibly more). If the Austrians then tried to
disengage to reach Verona, they could be caught in the open plain and destroyed
by the superior-number Piedmontese.
In order to fully protect all three crossings
instead, Radetzky would have had to stop his race to Verona, divide his forces
across 3 non-mutually-supporting locations not knowing beforehand where the
enemy would strike and hope he could hold all three. If one or two fell he
would risk isolation of at least one of his forces and possibly severe losses
if somehow the Piedmontese managed to cut his retreat lines to Verona – which was
exactly what he wanted to avoid by marching full speed to the fortress. So,
given that he may have had to retire to Verona anyway, it made sense to go
there immediately, and just leave token forces to blow up the bridges and delay
the advance. In the end, it proved to be the right thing to do.
Nessun commento:
Posta un commento